Our Golf Croquet rule modifications.
Last Updated 02/08/10.
Hits since 09/07/08:

To deal with situations such as this
special rules are needed:
- Golf Croquet rules are followed as
given here
except where impractical or excepted below.
- Relief: There are two broad categories of relief, relief from something that
is stopping you or otherwise interfering with you taking your stance covered in
2.1 and relief
from something that is impeding your backswing covered in 2.2 with one exception
covered in 2.1.3 where relief may be taken simply because something is blocking
the way to the next hoop (very limited and special circumstances).
- Relief to get an unimpeded stance (intended mainly for trees and the
like but also for walls parallel to one's intended line of play):
-
1 mallet head (9") of free relief from where the ball lies is available from sheds, trees, and other features not normally associated with croquet no closer to your target (exception noted below).
Relief is only available from obstacles that interfere with taking your
stance, relief is not available simply because something is between you and your
target (with one exception covered in 2.1.3).
-
Note that something like
Golf Croquet's official Rule 9 (c) applies here in that if a ball is
blocking your ball or otherwise encumbering your shot and you need
relief from some other object the blocking ball also gets moved in the same manner so it still
blocks your ball in the same fashion it did before relief is taken.
Not that all balls within a yard like 9 (c) dictates need be moved but
those that are reasonably deemed to have a good chance of interfering
should be.
-
Note also that balls are in play on shots played by others before relief is taken,
no ball in hand
business or outside agency stuff going on here. Should another player
decide they want to eliminate your ball but because it's chock up
against something it can't be that's just too bad.
-
Relief should also not improve one's line on one's target, especially if
it's a hoop. Granted sometimes you just gotta take relief that
gives you a better angle on the hoop
(like being on the left up against the sheds on
hoop 8's new location) but it
is to be avoided if
possible.
-
No closer to target may be excepted by being more off side if no
closer to the hoop results in no relief. Otherwise 2.1.2
should be used.
-
Should one mallet head not be sufficient to gain relief the ball can be placed at any
distance on a
line through the target and the ball's position no closer to the target.
Whereas the official Rule 9 (a) allows closer to the target we don't (relief closer
to the target is covered in 2.2 below).
-
Compassionate Relief:
The one case where you can take relief when an obstacle is just
blocking your intended path and not your backswing or stance is when you
are playing one of the first three shots after a hoop has just been run
and your line to the next hoop is hopelessly obscured by an obstacle
(usually this is after hoop 1 or
hoop 8 has just been run and
there's a shed in the way). Here 2.1.2's relief may be taken by taking the
ball away on a line to the target so you can bank the
shot off a wall for instance and stand a chance of at least getting the
ball in the vicinity of the next hoop. This is because it can be
rather irritating when one ball can get sent on to the next hoop solely
because it is close enough to an obstacle to get relief but another ball that
is similarly blocked but isn't close enough to the obstacle to have
the shot's stance
or swing be impeded instead winds up getting left miles behind the other balls.
In the rare case where 2.1.2's relief is not be relief (ie you
still can't bank a shot off a wall towards the destination hoop and this
tends to occur after hoop 11 is run and your ball is on the other side
of the sheds rather than the hoop 12 side) and you have to hit your ball
around two corners of the intervening shed to get to the next hoop you can place your ball
within four mallet heads (36" or a mallet handle length) of the nearest
corner of the obstructing shed that you'd have to hit around no closer
to the target hoop. Probably have to draw a diagram for that one
day I suppose...
- Note that in the instance where the ball that runs the hoop wasn't the
ball that was struck (ie it was peeled through the hoop by another
ball) the ball that ran the hoop (the peelee) doesn't get relief,
the other three balls do.
- Relief from something impeding the backswing or reasonable
follow through (intended mainly for walls blocking your backswing,
specifically not intended for walls parallel to your line of play
that are only interfering with your stance where 2.1.1 should be used):
- You may take two mallet head lengths (18") of
free relief perpendicularly from the obstacle (not from where the ball
lies) even if it places the ball closer to the target.
- If your ball
clearly has no shot at the hoop (ie it's well offside) this can be
three mallet heads (27") of relief.
- Or should the nearest hoop to
you not be the one you are going for or you are going for one of the
middle hoops (5, 6, 11 and 12)
and you're up against a perimeter wall then four mallet heads (36" or a mallet handle length) of relief may
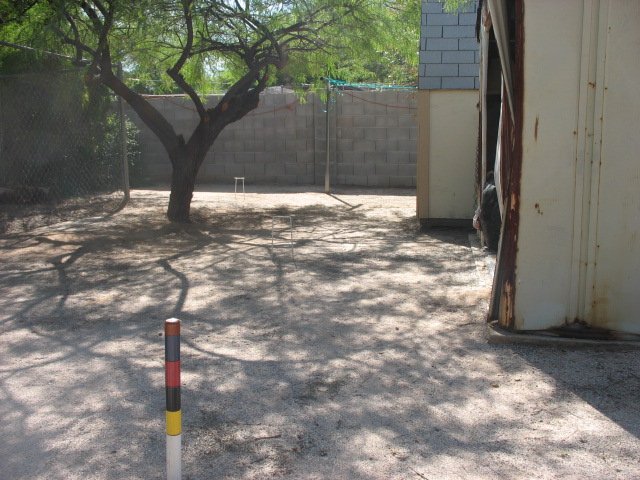
be taken. Should you be up against an obstacle within the
court (such as one of the sheds that are in the
middle of our court) then the most relief you can take is 2.2.2's
27". The constraint of having to be on the perimeter is
needed so that on our court you can't get enormous relief when going for
hoop 4 and lodging up against the shed
next to hoop 5.
- And some days you just gotta combine relief rules. Normally
this occurs when a ball has been knocked into a corner and you need
relief from both walls but like I found out the other
day it can occur elsewhere. Think I must have been playing for
hoop 7 when my ball wound
up between the shed and the bird of paradise. 2.1.1's 9" right or left
couldn't get away from the shed and 2.2.2's 27" perpendicularly out from the
shed was in the plant. So I had to take 27" out from the wall and then 9" to
the right of the greenery. Granted I could have used 2.1.2 and put the ball all
the way behind the two sheds 30' away and around two corners -- but
that's a little more punitive than we intend ;)
- Note that
it's basically taking relief from one obstacle and then taking relief
from another different obstacle, you can't take relief twice on account
of one obstacle.
- Double hits: Hah, forget it, whack away with impunity. Just don't be pushing the ball
deliberately...
- Stump Rule: While we don't have any actual stumps in the back yard
court (well, we did but I whacked it) some of the courts we use at the U do so we play the stump rule
(thanks to the
Berkeley X-treme Croquet site for this little gem). From the Berkeley site: If a player's ball comes in contact with a
tree stump, boulder, or other distinct object (i.e., not a dirt mound),
that player has the option of placing the ball on top of that object on
his or her next shot and teeing off.
- Rainy Day Rule: If it's wet enough bits of sand and grit will stick
to the balls (especially after they've just been whacked through a
puddle) and said grit besides not only really screwing up your intended
line also actually damages the mallets. So you're allowed to
rotate the ball in place till a clean bit of the ball is presented for
striking by the mallet.
Should you really want to communicate you can eMail to:
jforster@someplace.spam.dont.go
The Top.