- Connecting to the SGI ICE Front End
- Transferring Files
- Using Xdisk and /scratch Storage
-
Modules
- Compilers and Options
- Scientific Libraries
- Batch System
Connecting to the SGI ICE Front End
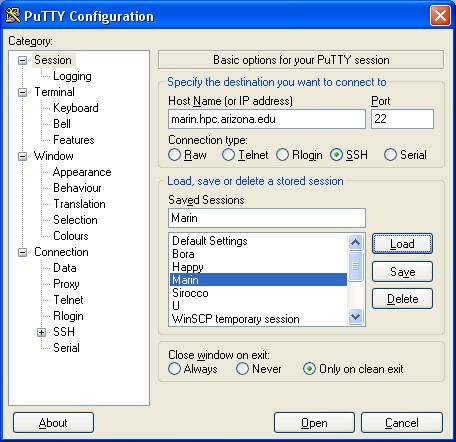
Access to the SGI ICE front end is through secure shell (ssh) to ice.hpc.arizona.edu . Make sure that you are using a ssh version 2 compliant client.For Microsoft Windows users, you may use PuTTY for connecting to ice.
For connecting from a UNIX/Linux machine, type at the shell
prompt:
ssh ice.hpc.arizona.edu
You may have to type "ssh username@ice.hpc.arizona.edu" if you have different username on both machine.
Users can transfer files to or from ice using a secure copy (scp) or secure File Transfer software(SFTP). The scp (or SFTP) software is included in recent releases of Unix based operating systems (including Linux and Mac OS X). Mac OS X users who prefer to have a graphical front end for SFTP can install a free utility called FUGU on their local machines. Windows users may install WinSCP ,which is an open source freeware SFTP client for Windows. Both FUGU and WinSCP have a graphical interface with user friendly features, such as "drag and drop" upload and download of files. Note that file transfer using ftp is not allowed .
When using SFTP with a graphical interface (Windows/Mac OS X):
Start the SFTP application and open a connection to host ice.hpc.arizona.edu . You will have to enter your username,but other fields (port number, etc) can be left empty (or leave the default value, if any). You will be prompted for your password. Once the connection is established, you can upload or download files.
Example of command line sftp usage on Unix/Linux/Mac OS X:
To transfer files between ice.hpc.arizona.edu and aura.hpc.arizona.edu:
1. Log onto ice first using a SSH 2 compliant terminal client.
2. sftp username@beowulf.hpc.arizona.edu
(username can be omitted if it's the same on both local and remote machine.)
You may then use put or get command at the sftp> prompt for the file transfer. Type help at the sftp> prompt for commands and their usages.
Examples of command line scp usage on Unix/Linux/Mac OS X:
Log onto ice first using a SSH 2 compliant terminal client, and change to a desired working directory.
To transfer files from beowulf to ice:
scp -rp username@ beowulf.hpc.arizona.edu: subdirectory .
To transfer files from ice to beowulf:
scp "file1 file2" username @ beowulf.hpc.arizona.edu:subdirectoryThe transferred file will be at your working directory. (Note: username @ can be omitted if your username on both machine is the same. )
Wildcards can be used for multiple file transfer (e.g. all files with .dat extension):
scp username @ice.hpc.arizona.edu: subdirectory /\*. dat .(Note the backslash " \ " preceding * in the last example.)
For more information, type "man scp" at the shell prompt. "-r"option is good for transferring directories and files in the directories. "-p" option is good for preserving time and mode from the original files.
Using Xdisk and /scratch StorageThe local utility xdisk is used to administer temporary allocations of additional disk space.
- You are able to extend the storage size and expiration within limits--a large space can be allocated for only days; a small space can be allocate months.
- Before your allocation expires , you will be sent several daily email notices to your HPC email account. (All mail to your HPC account will automatically be forwarded to your email.arizona.edu account.)
- Your files are purged once your space allocation expires. Xdisk areas are not backed up. (Only your Home directory is backed up.)
- You have to request the storage size for a number of days based on the following matrix.
************************************

 DAYS    MB     DAYS    MB
   45  200000     122   73770
   53  169811     130   69230
   61  147540     138   65217
   69  130434     146   61643
   77  116883     154   58441
   85  105882     162   55555
   93   96774     170   52941
  101   89108     178   50561
  109   82568     186   48387
  117   76923     194   46391

************************************
Examples of using xdisk command and its options:
1. Show the usage
xdisk -c help
|
*************************************************
USAGE is xdisk -c create [-h hostname] [ -m MB -d days]
|
2. Create additional disk space
-
xdisk -c create -m 73770 -d 122
This creates 73.77 GB of extra xdisk storage for 122days. If you simply type xdisk -c create , without specifying the size and days, you'll receive the default allocation, which is 46.39 GB for 194 days.
3. Get information on your allocation
-
xdisk -c query
4. Extend the life of your allocation
Allocations can be extended once for as many days as allowed by the time/space matrix. (The larger the space allocated, the shorter the time allowed; the smaller the space, the longer its allowable retention.)
-
xdisk -c expire -d 122
5. Modify the size of your allocation
-
xdisk -c resize -m -10000
This command will reduce the size of the allocation from the original 100000 MB by 10000 MB (note the negative 10000).
6. Delete your allocation
- xdisk -c
delete
If your allocation is about to expire and you cannot extend its life, then you need to save your files either to another server or another place within hpc.arizona.edu or u.arizona.edu.
You may create a temporary directory in /scratch first:
mkdir /scratch/username
Then use the command scp to copy a directory:
cp -pr /scr2/username /scratch/username/save-xdisk
Then you manually delete your xdisk allocation, create a new one and copy the files back to your new xdisk storage:
- cp -pr
/scratch/username/save-xdisk/* /scr2/username
The above command will recursively copy all files and directories back to your new xdisk allocation. When you have verified that your files are indeed in your allocation, you can let the nightly purge of scratch space delete your temporary directory in /scratch or you can do it yourself:
- rm -r
-f /scratch/username/save-xdisk
Notes about /scratch:
- Files on /scratch will be removed daily at 3am starting Saturday, November 14, 2009.
- When using /scratch space to temporarily store xdisk data and creating a new xdisk space, make sure that you have enough time to work on it before the daily purge time.
- /scratch space should not be used for running regular interactive or batch job as files and outputs may be deleted before you can save them somewhere else.
Modules
The Modules package is used to customize your environment settings. It allows you to control what versions of a software package will be used when you compile or run a program in your current login session.
Using modules
1. To set your shell to use the Intel C and Fortran compilers
module load intel
This will change your environment variables to select the default Intel Fortran compiler.
2. To list available module commands
module help
This will produce a list of all the available module commands.
3. To list available modules
module avail
This will produce a list of all the available modules
Back to the top
Compilers and Options
Several version of Intel compilers are installed as loadable modules. After the module is loaded, you may use icc to compile C or C++ programs, and use ifort to compile Fortran77 and Fortran90 programs. Type module avail to see what version of the Intel compilers are available. For example, type module load intel at the shell prompt to load a version of Intel C and Fortran compiler respectively. (Note: Type module help for the usage of module command.) After the module file is loaded, you may type man icc or man ifort to read the manual pages for the detailed compilation flags and features about the C or Fortran compiler.
Useful flags for the Intel compilers:
| -O0 | Disables optimization. |
| -O1 | Optimize to favor code size and code locality. |
| -O2 or -O | Default optimization. Less overhead for short loops. |
| -O3 | Triggers more SWP, prefetching, loop reorganization. High overhead for short loops . |
| -ip | Intra-file interprocedural optimization. |
| -ipo | Inter-file interprocedural optimization. |
| -ftz | Flush underflows to zero. Avoid kernel traps. Enabled by default at -O3. |
Intel compiler/linker flags for parallel programming:
| -openmp | Compiles and links Fortran/C OpenMP programs. | |
| -parallel |
|
Examples of compiling a serial code:
1 To compile a Fortran 90 serial code:
ifort -O program.f90
2. To compile a C serial code:
icc program.c
3. To compile a Fortran 77 serial code:
ifort program.f
Examples of how to compile and run parallel programs:
1. To compile MPI codes:
module load intel-mpi (Intel MPI)
mpiifort prog.f
mpiicc prog.c
(C)
Note that other compilation flags can also be included.
Run it using 4 processors with the command:
mpirun -np 4 ./a.out
2. To compile OpenMP codes:
ifort -openmp prog.f
(Fortran77)
icc -openmp prog.c
(C)
Run it using 4 processors with the commands:
setenv OMP_NUM_THREADS 4
./a.out
In general the Intel Fortran and C/C++ compilers perform significantly better on the ICE than the corresponding GNU compilers, therefore it is our recommendation that you avoid using the latter whenever possible.
Back to the top
Scientific Libraries
Intel Math Kernel Library (MKL)
The Intel Math Kernel Library (MKL) is composed of highly optimized mathematical functions for engineering and scientific applications requiring high performance on Intel platforms. The functional areas of the library include linear algebra consisting of LAPACK and BLAS, fast Fourier transform (FFT),and Vector math library (VML).
To use MKL, type at the shell prompt:
module load intel-mkl
You may then link to the library of your choice. For example:
-lmkl
-lmkl_lapack
-lmkl_lapack64
Example:
To compile a Fortran 90 code that uses Lapack math library from MKL:
module load intel-fc
module load intel-mkl
ifort prog.f90 -L/opt/intel/ictce/3.1/intel64/mkl/10.0.011/lib/em64t -lmkl_lapack -lmkl
time ./a.out
More info in: /opt/intel/ictce/3.1/intel64/mkl/10.0.011
Back to the top
Batch System
HPC Batch Queues
| Job Memory Size | Processor
Memory Size |
Job Time Limit | # of Parallel Processors | Queue Name | # of
Queues |
|---|---|---|---|---|---|
| 256 GB | 2GB | 1600 cpu hrs and 10 days wallclock time | 128 | High_priority* | 1 |
| 256 GB | 2GB | 1600 cpu hrs and 10 days wallclock time | 128 | Medium_priority** | 1 |
| 256 GB | 2 GB | 1600 cpu hrs and 10 days wallclock time | 128 | Default*** | 1 |
| 256 GB | 2 GB | 1600 CPU hrs and 10 days Wallclock time | 128 | Windfall**** | 1 |
|
* This queue is reserved for PI's who contribute resources to system, for example, by buying and adding some number of cpu's. Each PI and her/his group will get an allocation equal to cpu time that they are adding to the system. Please contact Research Computing .; ** This queue is reserved for PI's who are allocated extra cpu time based on the merit. A committee of peers will decide on extra cpu time allocation for each PI/project. Only users with merit base allocation can submit jobs to this queue. Requests for Merit cpu time allocation should be send to Research Computing .; *** This is the default queue and all users should submit their jobs to this queue initially. Users can ask for up to 128 processors for their jobs, however their quota will be charged for total cputime=(number-of-cpu*hours), even if their jobs uses a fraction of the number of cpu's they are asking for. . **** This queue is using the "unused"cycles. Users who run out of their monthly quota can submit their jobs to this queue Configuration , number and size of these queues may be changed with limited notice, as resources and demand dictate. |
Each PI is "guaranteed" 1000 hours (#of allocated cpu's*elapsed wallclock time) on the system per month. Each PI is responsible for allocating this time to members of her/his team. This cpu time is on a"use it or lose it" basis. At the end of each job the output file will include the number of "cputime" used and PI's account balance. For more information on policies governing the use of the HPC system please goto policies . To see some script examples of submitting your jobs to the queues, please see .
Note: PBS or the Systems staff may cancel your job(s) without notice for violation of these rules.
Useful Commands for PBS Batch System
1. Display status of PBS batch jobs, queues, or servers
qstat
Type "man qstat" for more details. Some useful options include "-a", "-q", and "-Q". Type at the shell prompt, qstat -a , qstat -q , or qstat -Q .
2. To submit a job to PBS batch queue
qsub myscript
Sample PBS scripts are illustrated in the following section.
3. To remove a job in the queue
qdel -W force job_id
4. Print user identity
id
5. Print the groups a user is in
groups
6. View user CPU-Walltime allocation status
va
Note: Use the group name you see here for group_list in the PBS script.
7. Run interactive PBS jobs
The following is an example of starting an interactive PBS job using "qstat -I".
qsub -I -q default -W group_list=hpcteam -l nodes=1:ppn=8 \
-l mem=8gb:walltime=2:0:0
Sample PBS ScriptsA batch script - a text file with PBS directives and job commands -is required to submit jobs. PBS directive lines, which tell the batch system how to run your job, begin with #PBS . You may find your PI group name from va command. You need to use it for the group_list in your PBS script.
You may be penalized for not asking resources wisely. In general, it is more difficult for PBS to get the job requesting more resuorce to run. Please also note the following: (1) Requesting too much wall clock time and/or cpu time for problematic code will waste your allocation. (2) Requesting too much memory not needed will be penalized for the expense of your cpu-walltime allocation. For instance, asking 8 GB memory for a 1-processor job will actually be allocated 4 processors since there is only 2 GB local memory to each processor.
For a serial job using one (1) processor, as shown in the sample script #1, make sure that both "#PBS -l select=1: ncpus=1" and "#PBS -lplace=pack:shared" are included in your batch script. Otherwise, a whole cpu node, which contains 8 cpus, will be allocated. Alternatively, as shown in the sample script #2, you may run the maximum of 8 serial 1-processor jobs in one batch using all 8 cpus in the cpu node.
Since PBS allocates the number of processor to a job based on the number of cpu nodes needed, for a job using more or equal to 8 processors, please request the number of processors in the multiple of 8.
There are 240 hours of maximum walltime and 1600 hours of maximum total cpu time set in the queue. A job will be killed whenever either limit is reached.(The total cpu time is roughly the number of processors allocated times the wall clock time.)
For threaded programs using OpenMP or Pthread, the maximum number of cpus per batch job is limited to the number of cpus on a node, i.e. 8.
1. Script to run a serial job using one cpu
#!/bin/csh
### Set the job name
#PBS -N myscp
### Request email when job begins and ends
#PBS -m bea
### Specify email address to use for notification.
#PBS -M username@email.arizona.edu
### Specify the PI group found with va command
#PBS -W group_list=mygroup
### Set the queue to submit this job.
#PBS -q default
### Set the number of cpus that will be used.
#PBS -l select=1:ncpus=1
### Important!!! Include this line for your 1p job.
### Without it, the whole cpu node containing 8 cpus will be allocated.
#PBS -l place=pack:shared
### Specify up to a maximum of 1600 hours total cpu time for 1-processor job
#PBS -l cput=48:0:0
### Specify up to a maximum of 240 hours walltime for the job
#PBS -l walltime=48:0:0
cd /scr2/username/code_directory
date
/usr/bin/time your-executable
date
2. Script to run 8 serial jobs using 8 cpus
#!/usr/bin/perl
### Set the job name
#PBS -N myscp8
### Request email when job begins and ends
#PBS -m bea
### Specify email address to use for notification.
#PBS -M username@email.arizona.edu
### Specify the PI group found with va command
#PBS -W group_list=mygroup
### Set the queue to submit this job.
#PBS -q default
### Set the number of cpus that will be used.
#PBS -l nodes=1:ppn=8
### Specify up to a maximum of 1600 hours total cpu time for 1-processor job
#PBS -l cput=192:0:0
### Specify up to a maximum of 240 hours walltime for the job
#PBS -l walltime=24:0:0
$pid1=-1;
$pid2=-1;
$pid3=-1;
$pid4=-1;
$pid5=-1;
$pid6=-1;
$pid7=-1;
$pid8=-1;
$workdir_base = "/scr2/username";
if (!defined($pid1=fork())) {
print "ERROR: cannot fork: 1\n";
}
if ($pid1==0) {
chdir "$workdir_base/code_directory1";
system "./a.out1";
exit;
}
if (!defined($pid2=fork())) {
print "ERROR: cannot fork: 2\n";
}
if ($pid2==0) {
chdir "$workdir_base/code_directory2";
system "./a.out2";
exit;
}
if (!defined($pid3=fork())) {
print "ERROR: cannot fork: 3\n";
}
if ($pid3==0) {
chdir "$workdir_base/code_directory3";
system "./a.out3";
exit;
}
if (!defined($pid4=fork())) {
print "ERROR: cannot fork: 4\n";
}
if ($pid4==0) {
chdir "$workdir_base/code_directory4";
system "./a.out4";
exit;
}
if (!defined($pid5=fork())) {
print "ERROR: cannot fork: 5\n";
}
if ($pid5==0) {
chdir "$workdir_base/code_directory5";
system "./a.out5";
exit;
}
if (!defined($pid6=fork())) {
print "ERROR: cannot fork: 6\n";
}
if ($pid6==0) {
chdir "$workdir_base/code_directory6";
system "./a.out6";
exit;
}
if (!defined($pid7=fork())) {
print "ERROR: cannot fork: 7\n";
}
if ($pid7==0) {
chdir "$workdir_base/code_directory7";
system "./a.out7";
exit;
}
if (!defined($pid8=fork())) {
print "ERROR: cannot fork: 8\n";
}
if ($pid8==0) {
chdir "$workdir_base/code_directory8";
system "./a.out8";
exit;
}
waitpid($pid1,0);
waitpid($pid2,0);
waitpid($pid3,0);
waitpid($pid4,0);
waitpid($pid5,0);
waitpid($pid6,0);
waitpid($pid7,0);
waitpid($pid8,0);
3. Script to run a MPI job
#!/bin/csh
### Set the job name
#PBS -N myscp32
### Request email when job begins and ends
#PBS -m bea
### Specify email address to use for notification.
#PBS -M username@email.arizona.edu
### Specify the PI group found with va command
#PBS -W group_list=mygroup
### Set the queue to submit this job.
#PBS -q default
### Set the number of cpus up to a maximum of 128
#PBS -l nodes=4:ppn=8
### Specify up to a maximum of 1600 hours total cpu time for the job
#PBS -l cput=768:0:0
### Specify up to a maximum of 240 hours walltime for the job
#PBS -l walltime=24:0:0
cd /scr2/username/code_directory
### Include this only if you need to convert data file from big to little endian
setenv F_UFMTENDIAN big
source /usr/share/modules/init/csh
module load intel-mpi
date
/usr/bin/time -o mpi_prog.timing mpirun -np 32 ./mpi_prog.exe
date
4. Script to run an OpenMP job
#!/bin/csh
### Set the job name
#PBS -N myscp8
### Request email when job begins and ends
#PBS -m bea
### Specify email address to use for notification.
#PBS -M username@email.arizona.edu
### Specify the PI group found with va command
#PBS -W group_list=mygroup
### Set the queue to submit this job.
#PBS -q default
### Set the number of cpus up to the maximum of 8 for ICE cluster
#PBS -l nodes=1:ppn=8
### Specify up to a maximum of 1600 hours total cpu time for the job
#PBS -l cput=192:0:0
### Specify up to a maximum of 240 hours walltime for the job
#PBS -l walltime=24:0:0
cd /scr2/username/code_directory
setenv OMP_NUM_THREADS 8
unlimit
date
/usr/bin/time ./openmp_prog.exe
date
Back to the top